All
Archives
May 2022
|
Hello, my luscious bees! Yes, finally, after being busy with our new Kitchen, saying our final goodbyes to our four legged girls, and also dealing with a loss in my personally life, I'm now starting to get up to speed with my backlog of ideas. Now he's up in all his Android glory! If I’m being honest with you, this is a big little cake. Took me a whole week (with all of my planning), but I do hope this recipe saves you some of this time. If you do try this one out, please let me know. I never normally ask - as I feel if you want to share you will - however for this one especially I would love to see what you come up with. I do want to make this cake again (perhaps a different color next time). For everyone who does tag me, I'll be more than happy to include your cake at the bottom of this post, along with a link to your Instagram (after all... those who bake together, grow together). That’s enough of me talking, Let's just get to the tutorial already haha!  Heres a link to R2-D2, and all the common names for each part: https://sites.google.com/site/3dsfinfo/astromech-pages/droid-nomenclature What do I need?
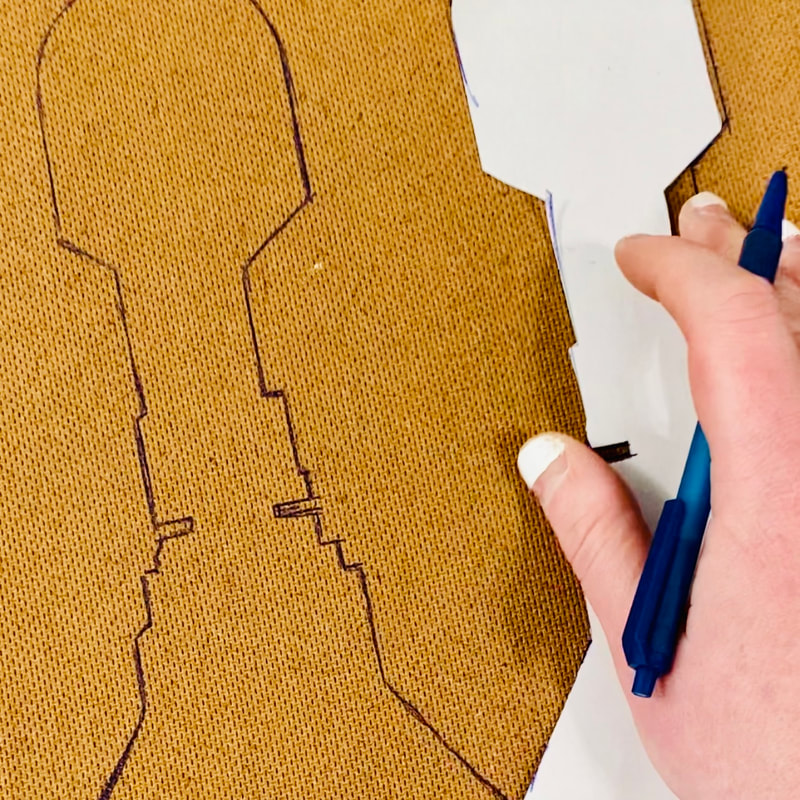
What do I do?Now my bees, before we get to constructing the cake, this section is all about how to make the legs, base, and decoration. We will be assembling it using simple 6" round cakes, and a 6" dome cake. For the actually cake recipes just pop over to the link here. Don’t start on the cakes until you have completed steps 1 - 11, then bake your cake before step 12. Now, before we begin: plan, plan, plan my darlings, then plan some more. Since I’ve started this cake journey it doesn’t matter how big or small your dessert is: plan. Trust me it will save you a lot of time and headaches, but it will all be worth it! 1. TemplatesHere is a handy template you can use. Feel free to adjust as needed, but this is designed to fit any standard printer, and be easy to transport. Simply print onto Letter-sized paper.
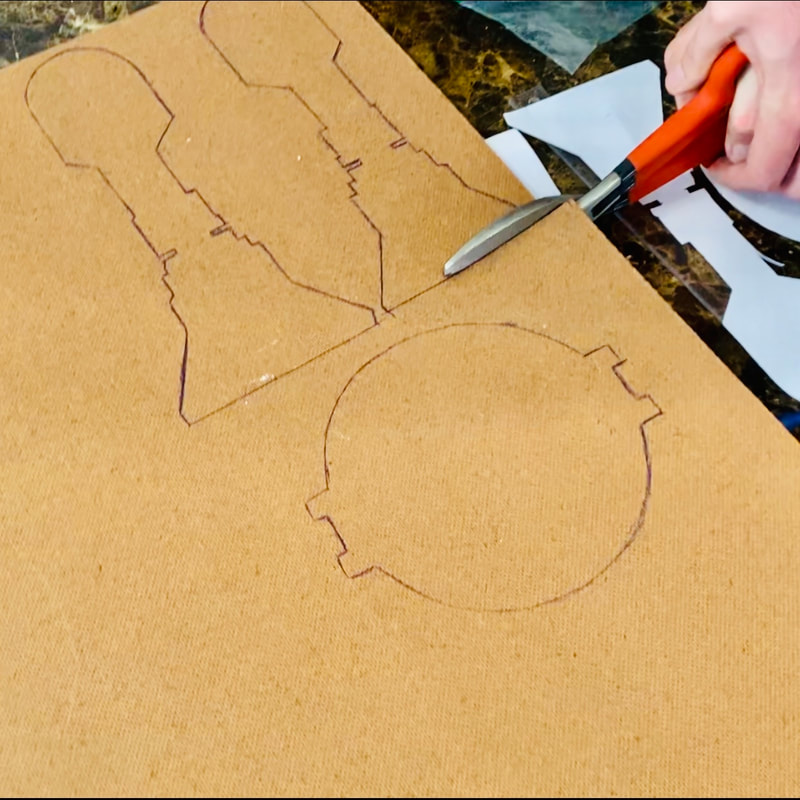
Once printed you can cut them out (sometimes I like to print a spare just in case. Sometimes you fudge up, it’s ok... it happens). Now you have cut out your templates, you want to trace around them on to your MDF with a sturdy pen or sharpie. Then once done, put your templates to one side, take a deep breath, pour yourself a drink. Now for the first hard part... I did this by hand using a tin-snips. This is not for the fate of hearts (took me a long time, trust me). Next time I plan on using a jigsaw (cutting by hand hurt like a motherfudger), so I advise you go with a jigsaw, if you're comfortable doing so. Please watch you fingers, and take your time. Like I said you can do this at least a week before, even earlier if needed.
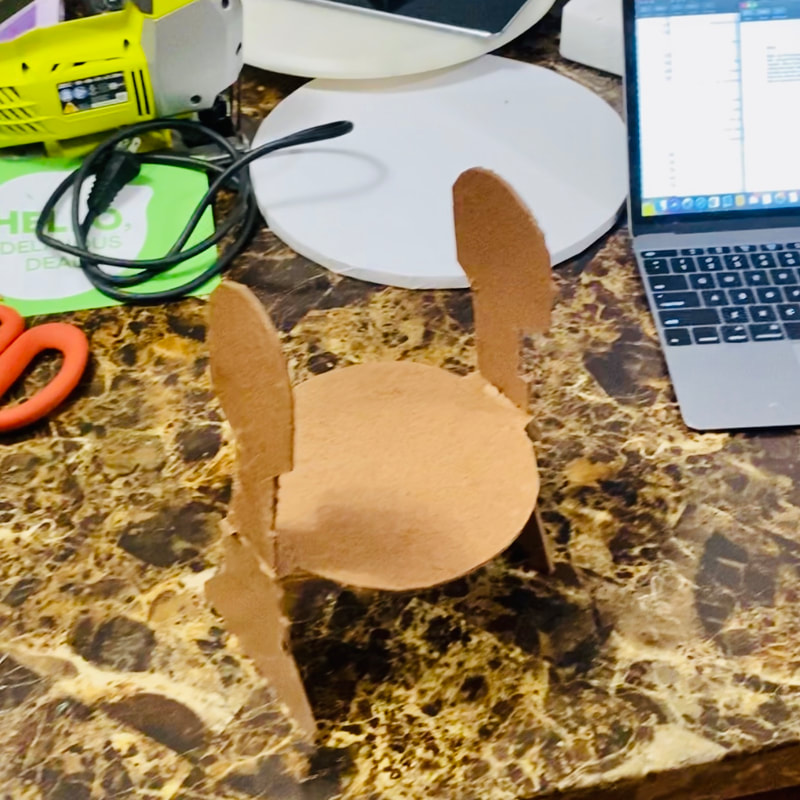
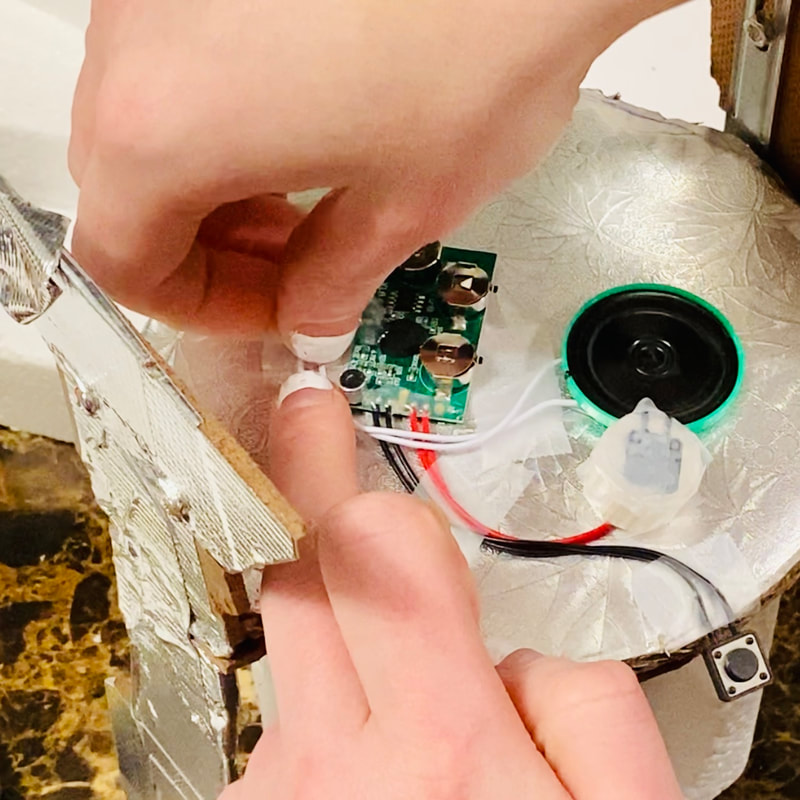
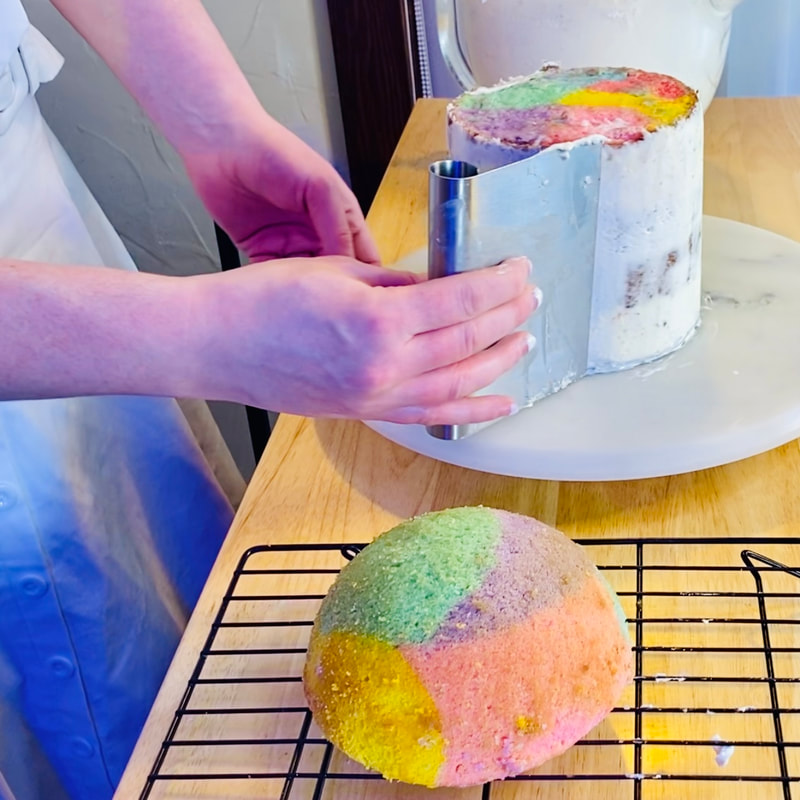
2. AssemblyHow did you do? Let’s hope you still have all your fingers intact. Now, my bees, time to assemble (no Avengers pun intended, this is Star Wars after all, a different Disney property). With your MDF pieces cut out, interlock them together. You may have to give it a little wiggle, but be gentle. You can add some glue to help it be more sturdy, or add some metal angle-brackets, if your are extra like me. 3. Sound moduleOnce his standing you want to flip it upside down so your are looking at the bottom of the base (you can use a small box to rest the base on). Glue one of your cake boards onto the base, then position your sound module onto the center of the cake board, and carefully glue or tape it into place. Run the short wire with the switch to the back of the cakeboard, and affix it to the board with the switch facing toward you at the edge (this will now be the back of your R2D2, and also keeps the switch discreet, so you can wow your friends and family when he speaks to them). Cut out a 6" circle out of 1" deep styrofoam, and cut out in inner circle (you can use a 4" cookie cutter as a template for this). Carefully using an exacto knife, level the top outer edge slightly, and cut a small notch on the un-bevelled side to leave space for the switch. This styrofoam "skirt" will protect the sound module and switch, and provide the distinctive look to R2-D2's base. Glue your skirt on the bottom of the base, aligning the cut-out notch with the switch, so you are able to press it easily when needed. Now have drink or take five. You deserve it. 4. Base wrap-upCover over the skirt with a layer of rolled fondant. Then add individual pieces for the details. I cut out about 8-9 strips, about 1½" wide, let them dry a little, then attached them using a dab of water. Once dry, you can now flip him the right way up. Carve the feet out of styrofoam, followed by the rest of the legs (use your leg template again). Repeat twice, for your left and right legs, then glue your styrofoam legs to your MDF legs. Once in place, allow them to dry for a few minutes while holding them in place. Once in place, begin to carve out the details using the pictures as a reference. Once you are happy, my bees, you want to now cover them with a layer of fondant. You can use a dash of water or piping gel for adhesion. 5. Body & HeadWith a simple white vanilla batter, you want to divide it evenly between 6 bowls. To each add a little food coloring, using each color of the rainbow: green. sky blue, purple. pink. red, and yellow. (Of course you don’t have to do this part, but it's all about going that extra mile. We drag queens, always have to give 120%!!) With your three light greased 6" cake pans, and a 6" domed cake pan, add parchment paper and a sprinkle of flour, then add your cake batter a little at a time - a different color in each tin. Bake for 50-60 minutes on 350F, turning them halfway so they bake evenly. Once they are done, perform a toothpick test, if it comes out clean your good to go. Pop them out the oven then let them rest for 10 minutes. Gently run a clean knife around the cake, and let them cool for another 10-15 minutes, then pop them out to allow them cool completely on a wire rack. Stack your cakes. with butter cream frosting, and smooth away any excess. Pop them in the fridge. Now roll out your white fondant, and warp it around your R2D2 body. Repeat the process with your R2D2 head.
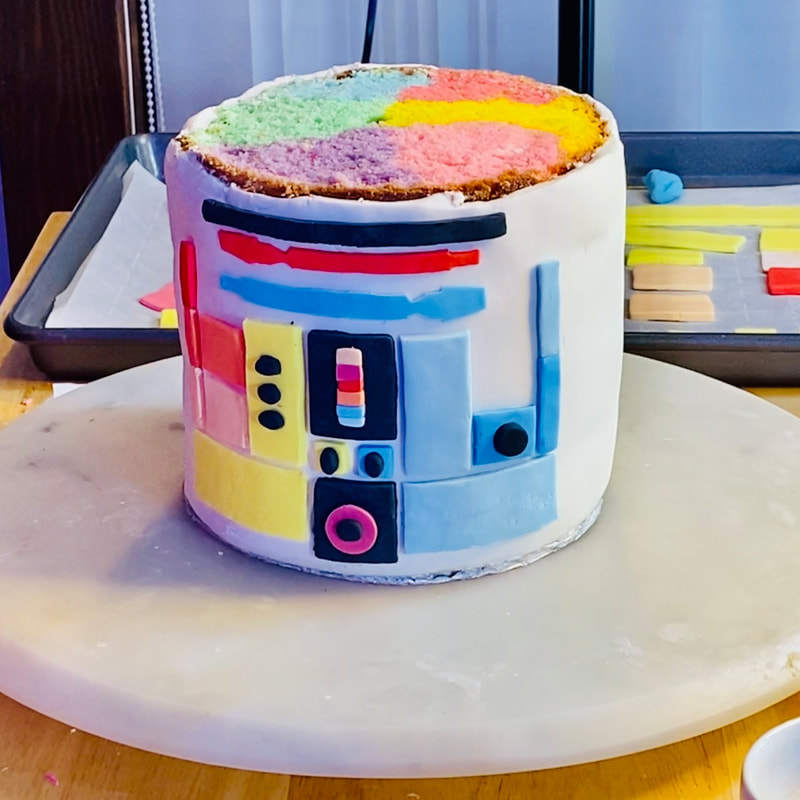
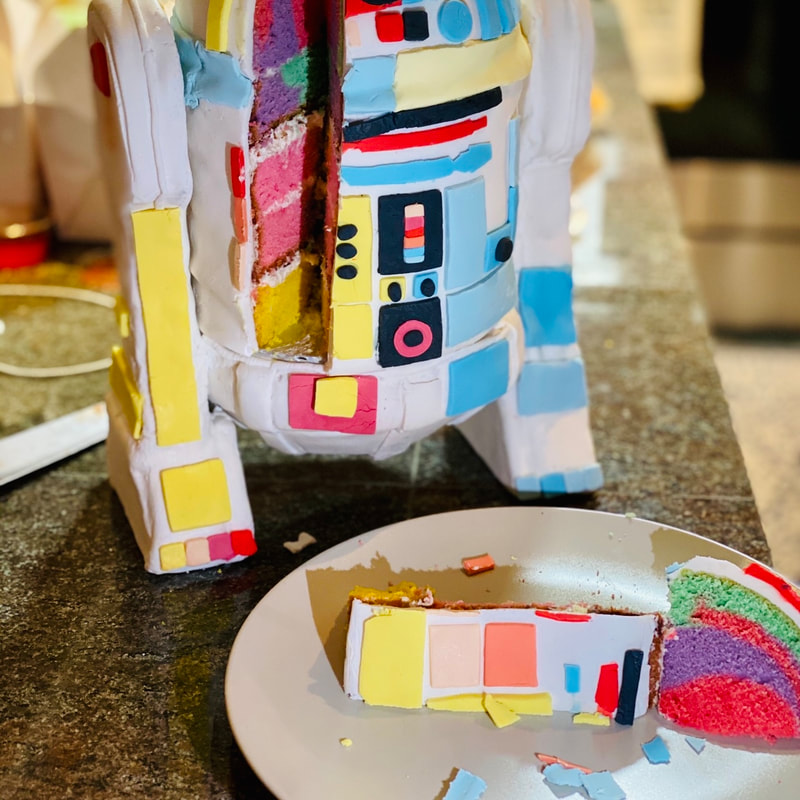
6. DetailingOnce your head and body is now coved in fondant, you can use a modeling tool to add some detail. Using serval different square/rectangular cutters (or a sharp knife) you want to cut out a number of different sizes and different colors, and attach them on to R2D2 body using a dash of water. You can use the image below as a guide for the shapes to cut, but feel free to get creative here. Tip: It helps if the fondant shapes are a little stiff, but still able to fold with out cracking. If they crack just run a dash of water on your bush or a clean fingertip over them once. Take your time. Don’t forget to add detail to the legs and the base. Once complete, you can assemble your R2D2. First with your leg and base stand, then pop a 6" cake board on to the base to help protect the cake, then pop the body on the cake board. Now with a dash of water or simple syrup pop the head on this will help the head and body fuse together). Add a long strip of colored fondant around the seam between the head and body (I used two separate colors to blend with the style of the detailed squares I used). And you're done 💅🏼. Now stand back and enjoy,
Please please please ;) tag me if you make this, so I can see your R2D2. You don’t have to go with rainbow colors as I did... go nuts try any color you want. This is just a guide to help my bees flourish. I plan to keep adding to this page as I work my way through the colors of the rainbow, improving as I go along. Tips, Tricks & Tiaras
0 Comments
Leave a Reply. |
||||||||||||

 RSS Feed

Website |
Lucille L'queur |
|